
Anatomy of a Bar
A great home bar is one that is great looking, functionally effective and optimum on space. All of us have seen bars which fail on one of these three dimensions. Building one that excels on all three outcomes needs a thorough understanding of the anatomy of a bar and making some critical choices upfront.
Dry or Wet: The first choice thing to make is if you want a dry bar or a wet bar. A wet bar comes with a sink, and you need to make sure you lay a water line to the place you’re planning to put the bar right at the construction phase of your home. The construction of wet bar gets little complicated and it requires more space. So, unless there is a really compelling reason, it’s easier to go for a dry bar with storage and a counter to serve drinks.
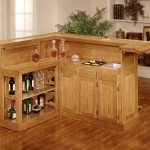

Bar Counter: The surface on which the drinks are made and served is called the bar counter. Ideally from an ergonomics point of view you should have a lower counter which is 30″ to 34″ high and a higher counter which is 40″ to 42″ high. The lower counter is the perfect place to slice lemons, set bottles, mix drinks or install a bar sink. If you are using wooden top then make sure you apply epoxy layers on the top to make it water resistant. You can add an element of interest by making the counter in stone, glass, concrete which is water resistant and hence ideal for the counter. The higher counter or the serving counter hides the mess on the mixing counter, adds to the style and is perfect for standing or to use the bar stools.
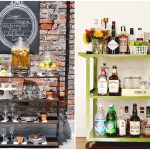
Storage: You need shelving for storing beer, wine, mixers, vodka, gin, rum, whiskey, bourbon, tequila, schnapps, triple sec, scotch, serving glasses and bar accessories. You need 2 heights of shelves for stocking all your alcohol bottles and mixers apart from the horizontal rack/storage for your wine. The smaller bottles are typically 9″ to 10″ tall so to store your beer, mixers, Old Monk, Baileys, etc a clear height of 11″ to 12″ is enough. The bottles of Whisky and Single malt which are little taller need a clear shelf height of 15″.
A drawer is ideal for storing the smaller items like the cork screws, cocktail shakers, bar mats, bottle openers, bottle spouts, straws, toothpicks, cocktail napkins, glass markers and stirrers. You can use the dividers inside to keep the drawer clutter free. Keep space for the garnishes on the lower or the mixing counter. The most commonly used garnishing are lemon and orange wedges, cherries, celery stalks, olives, fruit juices and ice in a pail or icebox. In case you are running short of counter space a movable trolley comes in handy for all the storage for a big event at home.
Wine rack: Wines are best stored horizontal. Depending on your requirement you can decide if you need more space for wine bottles or other alcohol. Each bottle requires roughly 4″x4″x 10″ space. You can decide to build the popular crisscross pattern with wood to store your wines. You can also have just the wooden slats keeping the bottles stacked safely. Apart from these there are many readymade wine bottle holders which can be used, depending on your style and look of the bar. Few words of caution though: A wooden classic looking bar may look odd with the steel wine bottle holder. You may even use a refrigerated wine storage, but again keep in mind the space, ventilation and the electric connection.


Bar fridge: Many people insist on a bar fridge. While it is a good idea to have all your ice and mixers closer to the counter most urban apartments do not have space for the same. If pressed for the space the ideal thing is to have the bar closer to your kitchen fridge or a store where you can have a fridge. Adding a bar fridge requires space not just for the fridge but for the ventilation too which eats into your storage. Also, most people use the “mini fridge” which heats up making the adjacent sides of the bar warm and hence unsuitable for storing liquor bottles in the adjacent shelf.
Overhead wine and champagne glass and glassware storage: This traditional way to display stemware usually comes in the form of a series of grooves to slide glass bases into, allowing them to hang upside down. There are readymade steel wineglass holders available in the market which can hold 4 to 8 glasses. Depending on whether you want it to be displayed through glass shutter or store them behind the wooden shutter is up to you and your choice. In addition to stemware, you will need space to store shot glasses, beer mugs, rocks glasses and high ball glasses.
Bar Stools/ Chairs: These are the tall stools or chairs with a footrest which can lift the mood of your bar. There are many designs readily available in traditional wood or the modern steel and rattan. If you have enough counter space then only you should go for the bar stools or chairs. The minimum stool spacing should be 2 feet of bar per seat. If you want it more spacious then add another 6″ to the space. With the counter height of 41″-43″ the ideal bar stool height should be 29″ to 31″. The extra tall bar stools can go up to 36″. Bar stools add the charm to the bar and hence it’s very important to choose the right ones with a comfortable seating and the right style to go with the overall décor.


Lighting: A Murano light over the counter can add the final touch to your bar. A bar is never complete without proper lighting. Bar lighting has to be according to the area you have selected for the bar and also the style of the bar. The most common lighting used for a bar is the pendant lighting. Based on the length of the counter you can have a single or multiple pendants from the ceiling hanging on the counter. If you are looking for lighting just the bar then go in for the opaque shades. It will illuminate the bar surface while offering the users more of a task light and intimate setting. You can also consider the ambient recessed lighting for your liquor or glassware display. You can use the LED spot or LED strip lighting for this. If you are using Onyx or glass counter then you can add interest to the top by putting LED under the counter. Adding neon signs on the wall can create funky backdrop for your bar. If you do not want to go over the top then just a table top light with a nice shade can add the character to the space.
There are a few other accessories which you can add to the above list of essentials. A Foot rail, bar moulding for the top, drink rail, drip lip, arm rail are some of the other elements which are not necessary for a home bar but if added will definitely add “Char Chand” to your home bar. Apart from this add a personal touch by throwing in accessories like coasters, tissue holders, candle stands, paintings, and decorative artefacts which you might have collected over the years of travel.


Once you have all of these sorted, you’re ready to host your first party at your brand-new, completely custom-made home bar. And while the initial set-up cost might be a little steep, you can now cut down on those expensive pub-crawls. With homemade canapes, ready-to-eat snacks and a few mixers and an ice-bucket, an evening at home is just as much fun while being super affordable as well. And you don’t need to worry about driving home afterwards!
Vishpala is an Architect and Furniture Designer (NID). For the last 14 years she has designed homes that are contemporary, classy and uniquely Indian. Her furniture blends functionality and form with the space to create a unique lifestyle experience. Her signature style is most visible in home bars and children’s rooms. She is passionate about traditional Indian arts and crafts and as a founder of Ekibeki works with artisans across the country to create contemporary lifestyle accessories and home furniture and interiors while improving the livelihoods of the artisans. She lives in Mumbai with her husband and 3 kids.
![Closing out the speakeasy night in style, Noctis brings its signature after-dark energy to wrap Mumbai’s first speakeasy week.
Expect secretly crafted cocktails, skyline views and the kind of night that doesn’t end when the lights come on.
📍 Nox, The Westin Mumbai Powai Lake
📅 25th July
[Tulleeho Bartakeover | Noctis | Nox Mumbai | Loca Loka Tequila | Speakeasy Night Mumbai | The Westin Mumbai | Powai Lake | Mumbai | Cocktail Bar Mumbai | Bar Takeover]](https://www.tulleeho.com/wp-content/plugins/instagram-feed/img/placeholder.png)